Monday 4 December 2017

Sahi Automation

SAHI - WALKTHROUGH

Introduction


QTP, RFT, Selenium, and Webdrive are a few examples
of the many commercial tools and open source frameworks for automated testing of
web applications. Sahi, a tool that's gaining popularity in
the realm of automated testing. Sahi is an open source tool that provides: powerful
abilities for recording and replaying across browsers; different language drivers for
writing test scripts (Java, Ruby); and support for AJAX and highly dynamic web
applications. Sahi also supports secure http  and NT LAN Manager authentications.

About Sahi

Sahi has several powerful features:

Sahi controller (IDE)

Works across browsers and records scripts in two modes:
Sahi or Java format.

Robust object identification

Is independent of HTML structure. Its intuitive APIs, such as near and in
method, can help locate browser elements even if the page has only a minor
change, eliminating the requirement of XPaths (which can be hard to
understand).

Implicit waits

Eliminates dealing with wait implementation, even for AJAX and page loads.
Testers don't need to know the internals of an application.

Installation and configuration

To install and configure Sahi:

1. Download the latest build and unzip the file. Sahi
requires Java 1.5 or later.
2. Start Sahi's proxy server. The startup scripts are in
<sahi_root>\userdata\bin.
  •  For Windows: start_dashboard.bat
  •   For Linux: start_dashboad.sh 
3.  Enter start_sahi.bat/start_sahi.sh, which is required for silent
execution with the assistance of build tools such as Ant.
Note: For Internet Explorer (IE) only, you have to manually configure the
browser to use Sahi's proxy. Or, you can use the tools provided by Sahi to
set the browser's proxy while starting the Sahi proxy server. The proxy
host and port are localhost:9999. (The port can be modified through
<sahi_root>\config\sahi.properties.)

Look At Sahi Dashboard


Recording scripts in Java format

Sahi provides two out-of-the-box script formats: Sahi and Java. You can modify the
default option, which is Sahi, in <sahi_root>\config\sahi.properties. The Sahi format
is a Java script-like format, running only within the Sahi Java script engine. The
example in this article uses the more common Java format because the scripts can
easily integrate with other testing tools and frameworks for large testing projects.
The Java format involves a common Java code snippet that can be integrated with
tools such as Junit and TestNG.

To run a brief test:

1. Open the web application that you want to test. Press the ALT key and
double-click on the page. (Firefox 3 was used for demonstration.)

2. Select Record, as shown in Figure:
SNAP - Controller for recording:


selection, it will change to the Stop button.

3. Do some operations in the web application, and then select Stop. All the
steps you executed in the application are recorded, as shown in Figure:
 SNAP - Recorded scripts by controller:
your operations are recording, you can insert some assertions if you want.
The tools also provide some options for insertions, but it is suggested you
add them manually.

Integration with Junit

JUnit, the unit testing framework, is very important in establishing your test-driven
development. In many cases, you can create test scripts in Junit format for
convenience and reporting. The previous example recorded test scripts in Java
format.

Requirements: 
1. Eclipse
2. Junit jar
3. Sahi Jar

When creating a junit4 format test script, you have to initiate some variables required for the Sahi
environment. The example in this article extends BaseTestCase.java so that all
others test cases can be executed by extending this class.
The demo4sahi class extends the BaseTestCase class to implement all initiating
tasks related to the Sahi proxy and then verifies two points:
• If the email format is OK, you will get OK.
• If the email format is incorrect, you will get Error.

Listing 1 shows a typical test script in Junit4 format

Code Snippet : 
                 

To run the test scripts unattended, you need to implement all initialization and
finalization for the Sahi runtime. There are four basic initialization parts, as outlined
in Table:

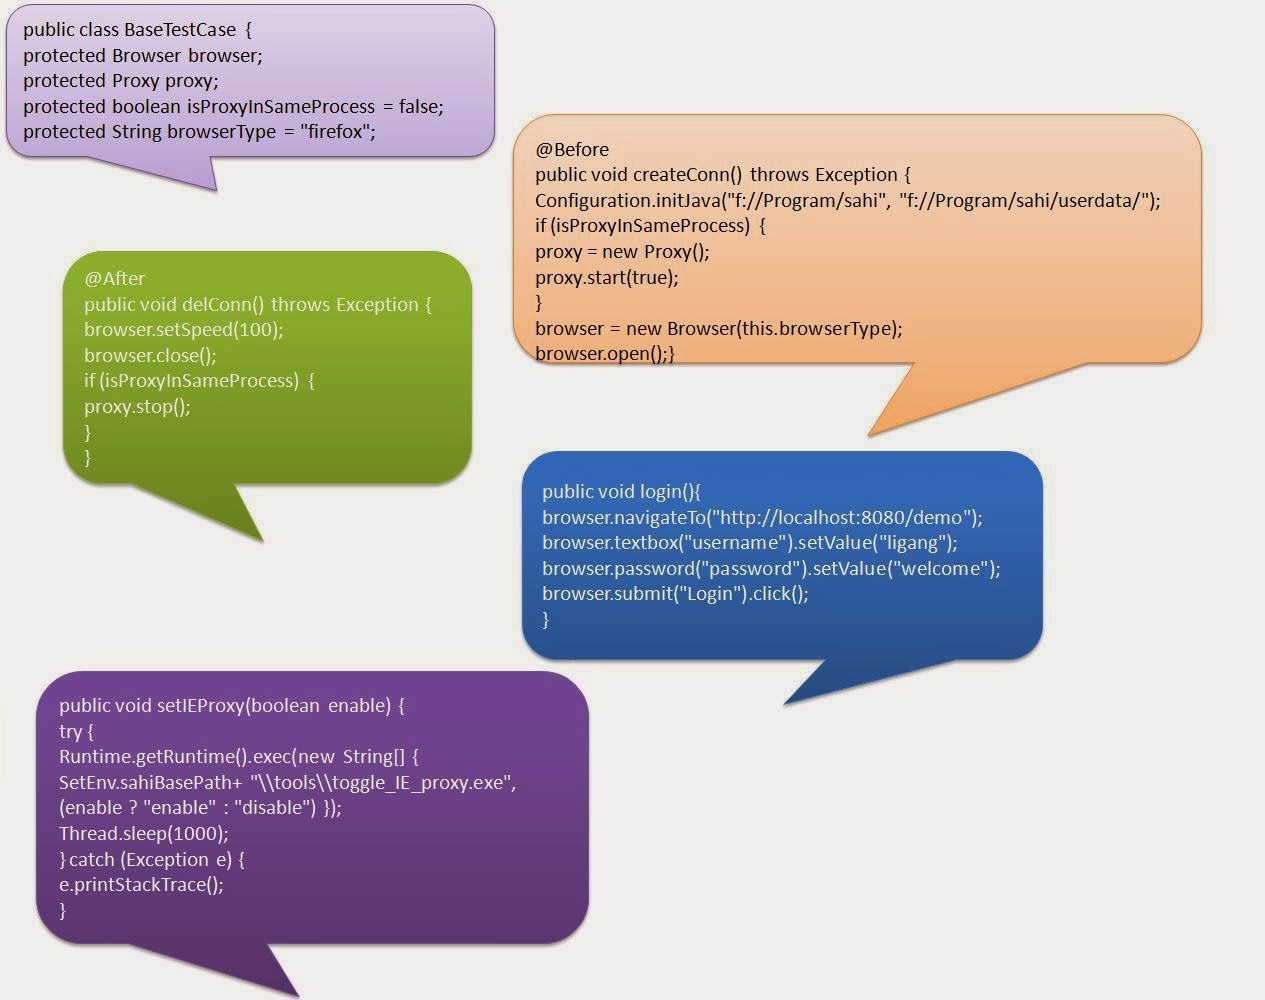
BaseTestCase, as the parent class of all test scripts, will invoke the createConn
method during runtime, ahead of all other methods, so it can open the browser to
simulate the user's operations. Listing 2 shows some of the code for
BaseTestCase.

Listing 2. BaseTestCase


Advanced topics

In web application testing, it's very important to effectively identify an object. Unlike
many other testing tools, Sahi has some powerful APIs to locate objects in a web
page. Table 2 outlines a few examples.

SUMMARY

This article has explored Sahi, a tool for automating web application testing. Sahi is
an open source tool that allows recording and replaying across browsers. In this
article, you learned about different language drivers for writing test scripts. A sample
application and test case showed how to format scripts for Junit and how to test with
Apache Ant. Sahi's advanced APIs were also outlined.

Kafka Automation

Kafka consumer client automation - JAVA

As the tech is moving towards micro services, integration is one of the key prone areas for major failures. Having said that this architecture is building lot of flexibility in development space.

Majoity consumers of these services are in B2B model, and few customer facing but again depends on product.

Below is the architecture of how services are consumed and used for other streams.


Providers basically keeps pushing data to kafka and consumers keep polling kafka for any updates and then utilize the same.

How to do automate this ?
First thing is you cannot read it as buffer stream, as our code doesn't know EOL hence keeps polling and doesn't terminate, one has to manually terminate the connection.

Hence we'll have to use kafka client jars to capture the notifications, below is the sample code

Jar: org.apache.kafka.clients.consumer

Properties props = new Properties();
             props.put("bootstrap.servers","localhost:9092");
             props.put(ConsumerConfig.AUTO_OFFSET_RESET_CONFIG"earliest");
              props.put("group.id", UUID.randomUUID().toString());
             props.put("consumer.timeout.ms",2000);
             props.put("key.deserializer","org.apache.kafka.common.serialization.StringDeserializer");
             props.put("value.deserializer","org.apache.kafka.common.serialization.StringDeserializer");
              KafkaConsumer<String, String> consumer = new KafkaConsumer<>(props);

consumer.subscribe(Arrays.asList("topic"));
try{
while(flag){
ConsumerRecords<String, String> recordsconsumer.poll(1000);
            flag=false;        
for (TopicPartition partition :records.partitions()) {
List<ConsumerRecord<String, String>>partitionRecords =records.records(partition);
                           for(ConsumerRecord<String, String> record :partitionRecords) {
record.offset() 
flag=true;
}
}
counter++;
                     if(counter!=20 && !flag){
                           Thread.sleep(1000);
                     }if(counter==20){
                           break;
                     }
}
catch(){}

The above snippet basically reads notifiers and when it has reached end, the exit criteria is poll for timer/boolean and break the loop.

SAP GUI - AUTOMATION (VBS AND JAVA)

 SAP GUI AUTOMATION

CONCEPTS DISCUSSED ON VBS AND JAVA:

Prerequisite:

1. SAP GUI With Scripting Enabled
2. Java i586 
3. Jacob


Here we are assuming that SAP GUI has scripting enabled, if there no way that scripting would be enabled then tools to look for would be UFT/UI Path. 

As our discussion is on Java mainly, I am more inclined towards enabling scripting. 

Lets start with VB Scripting First:

VBS: 
1. Once scripting is enabled you can see, record and playback button on gui as below,


2. Click on the same, which opens small widget containing play, record and stop button.

3. Click on record and enter user name and password.

4. Stop the recording, 

A file with .vbs extension would be created and you can replay this file using play button which opens the folder where script files are saved by default.

Sample vbs below:

Code Snippet:

If Not IsObject(application) Then
   Set SapGuiAuto  = GetObject("SAPGUI")
   Set application = SapGuiAuto.GetScriptingEngine
End If
If Not IsObject(connection) Then
   Set connection = application.Children(0)
End If
If Not IsObject(session) Then
   Set session    = connection.Children(0)
End If
If IsObject(WScript) Then
   WScript.ConnectObject session,     "on"
   WScript.ConnectObject application, "on"
End If


session.findById("wnd[0]").maximize
session.findById("wnd[0]/usr/txtRSYST-BNAME").text = ""
session.findById("wnd[0]/usr/pwdRSYST-BCODE").text = ""
session.findById("wnd[0]/usr/pwdRSYST-BCODE").caretPosition = 7
session.findById("wnd[0]").sendVKey 0


JAVA INTEGRATION:

We can make use of the recorded script to run via java. 
1. Download jacob 1.18, with java i586 

Here I am building simple java project no build tools used.

Steps:
1. Unzip jacob 
2. Copy dll to jre-> bin
3. Add jar to build path of java project.

Code Snippet below: 

Below snippet contains actions like type, doubleclick, select, press and I am using a bat which opens sapgui through command prompt.

import java.io.IOException;

import com.jacob.activeX.ActiveXComponent;
import com.jacob.com.ComThread;
import com.jacob.com.Dispatch;
import com.jacob.com.Variant;

public class test {

public static void main(String[] args) throws IOException, InterruptedException {
new ProcessBuilder("cmd", "/c", "startup.bat").start();
Thread.sleep(5000);

ActiveXComponent SAPROTWr, GUIApp, Connection, Session, Obj;
Dispatch ROTEntry;
Variant ScriptEngine;

ComThread.InitSTA();

SAPROTWr = new ActiveXComponent("SapROTWr.SapROTWrapper");
try {
ROTEntry = SAPROTWr.invoke("GetROTEntry", "SAPGUI").toDispatch();
ScriptEngine = Dispatch.call(ROTEntry, "GetScriptingEngine");
GUIApp = new ActiveXComponent(ScriptEngine.toDispatch());

Connection = new ActiveXComponent(GUIApp.invoke("Children", 0).toDispatch());
// -Set session = connection.Children(0)-----------------------
Session = new ActiveXComponent(Connection.invoke("Children", 0).toDispatch());

Obj = new ActiveXComponent(Session.invoke("FindById", "wnd[0]/usr/txtRSYST-MANDT").toDispatch());
Obj.setProperty("Text", "100");

Obj = new ActiveXComponent(Session.invoke("FindById", "wnd[0]/usr/txtRSYST-BNAME").toDispatch());
Obj.setProperty("Text", "Z001T97");

Obj = new ActiveXComponent(Session.invoke("FindById", "wnd[0]/usr/pwdRSYST-BCODE").toDispatch());
Obj.setProperty("Text", "Sting3#");

Obj = new ActiveXComponent(Session.invoke("FindById", "wnd[0]/usr/txtRSYST-LANGU").toDispatch());
Obj.setProperty("Text", "EN");

Obj = new ActiveXComponent(Session.invoke("FindById", "wnd[0]").toDispatch());
Obj.invoke("sendVKey", 0);

Thread.sleep(2000);

Obj = new ActiveXComponent(
Session.invoke("FindById", "wnd[0]/usr/cntlIMAGE_CONTAINER/shellcont/shell/shellcont[0]/shell")
.toDispatch());
Obj.invoke("doubleClickNode", "0000000050");

Obj = new ActiveXComponent(Session
.invoke("FindById",
"wnd[0]/usr/tabsTABSTRIP_WB_TAB/tabpUCOMM11/ssub%_SUBSCREEN_WB_TAB:/POSDW/SAPLMONITOR_SEL:0201/ctxtSO_SORG-LOW")
.toDispatch());
Obj.setProperty("Text", "234");

Obj = new ActiveXComponent(
Session.invoke("FindById", "wnd[0]/usr/tabsTABSTRIP_WB_TAB/tabpUCOMM12").toDispatch());
Obj.invoke("select");

Obj = new ActiveXComponent(
Session.invoke("FindById", "wnd[0]/usr/tabsTABSTRIP_WB_TAB/tabpUCOMM13").toDispatch());
Obj.invoke("select");

Obj = new ActiveXComponent(
Session.invoke("FindById", "wnd[0]/usr/tabsTABSTRIP_WB_TAB/tabpUCOMM14").toDispatch());
Obj.invoke("select");

Obj = new ActiveXComponent(
Session.invoke("FindById", "wnd[0]/usr/tabsTABSTRIP_WB_TAB/tabpUCOMM11").toDispatch());
Obj.invoke("select");

Obj = new ActiveXComponent(Session
.invoke("FindById",
"wnd[0]/usr/tabsTABSTRIP_WB_TAB/tabpUCOMM11/ssub%_SUBSCREEN_WB_TAB:/POSDW/SAPLMONITOR_SEL:0201/ctxtSO_STOGR-LOW")
.toDispatch());
Obj.setProperty("Text", "21");

Obj = new ActiveXComponent(Session.invoke("FindById", "wnd[0]/tbar[1]/btn[17]").toDispatch());
Obj.invoke("press");

Obj = new ActiveXComponent(Session.invoke("FindById", "wnd[1]/usr/txtV-LOW").toDispatch());
Obj.setProperty("Text", "21");

Obj = new ActiveXComponent(Session.invoke("FindById", "wnd[1]/tbar[0]/btn[12]").toDispatch());
Obj.invoke("press");

Obj = new ActiveXComponent(Session.invoke("FindById", "wnd[0]/tbar[0]/btn[3]").toDispatch());
Obj.invoke("press");

ComThread.Release();
ComThread.quitMainSTA();

}

catch (Exception e) {
e.printStackTrace();
}

finally {
ComThread.Release();
System.exit(0);
}

}

}

**- I recorded the script using sap gui recorder and used the same in above snippet.